What’s New
Welcome to the new major iteration of Shamat. You’ll notice immediately that the interface has changed in a number of ways. This was done to allow for better use of the screen space, making more tools and options available and displaying only those which the user desires. Additional changes were made for ease of use, and to support changes to the application itself.
One major change in the application is the handling of maps. Map layers are now truly distinct. In the original Shamat there were really only three layers: Base, Overlay, and Features (plus the Megahex superimposition). All other nominal layers lived in the Features layer, which made editing and differentiating things like Decor and Symbols difficult. Now everything truly lives on its own layer. One benefit of this new separation of layers is that you can now erase elements by layer, as well as toggle each layer's visibility on and off.
The other major architectural change in this release is the map file itself. The map is now saved in JSON format, which makes reading it and using it in other programs easier. The original bespoke map format was specific to Shamat and somewhat fragile, as it expected the file in a very rigid format. The new map format is much more flexible. The resulting map file is somewhat larger as well, but as the map files are mostly small text documents, the size increase is not meaningful in most circumstances, and is more than offset by the increased usability and stability of the map format. You can read more about the new map format in this document.
Some other notable changes in the new application are:
- Custom user-defined colors
- Expanded annotation characters
- Clone brush lets you paint with the selected hex
- Light/Dark interface themes
- Left/Right sidebar placement
Introduction
What follows is an introduction to the interface and the major elements that make it up.
The application is divided into three main areas, as this picture shows.
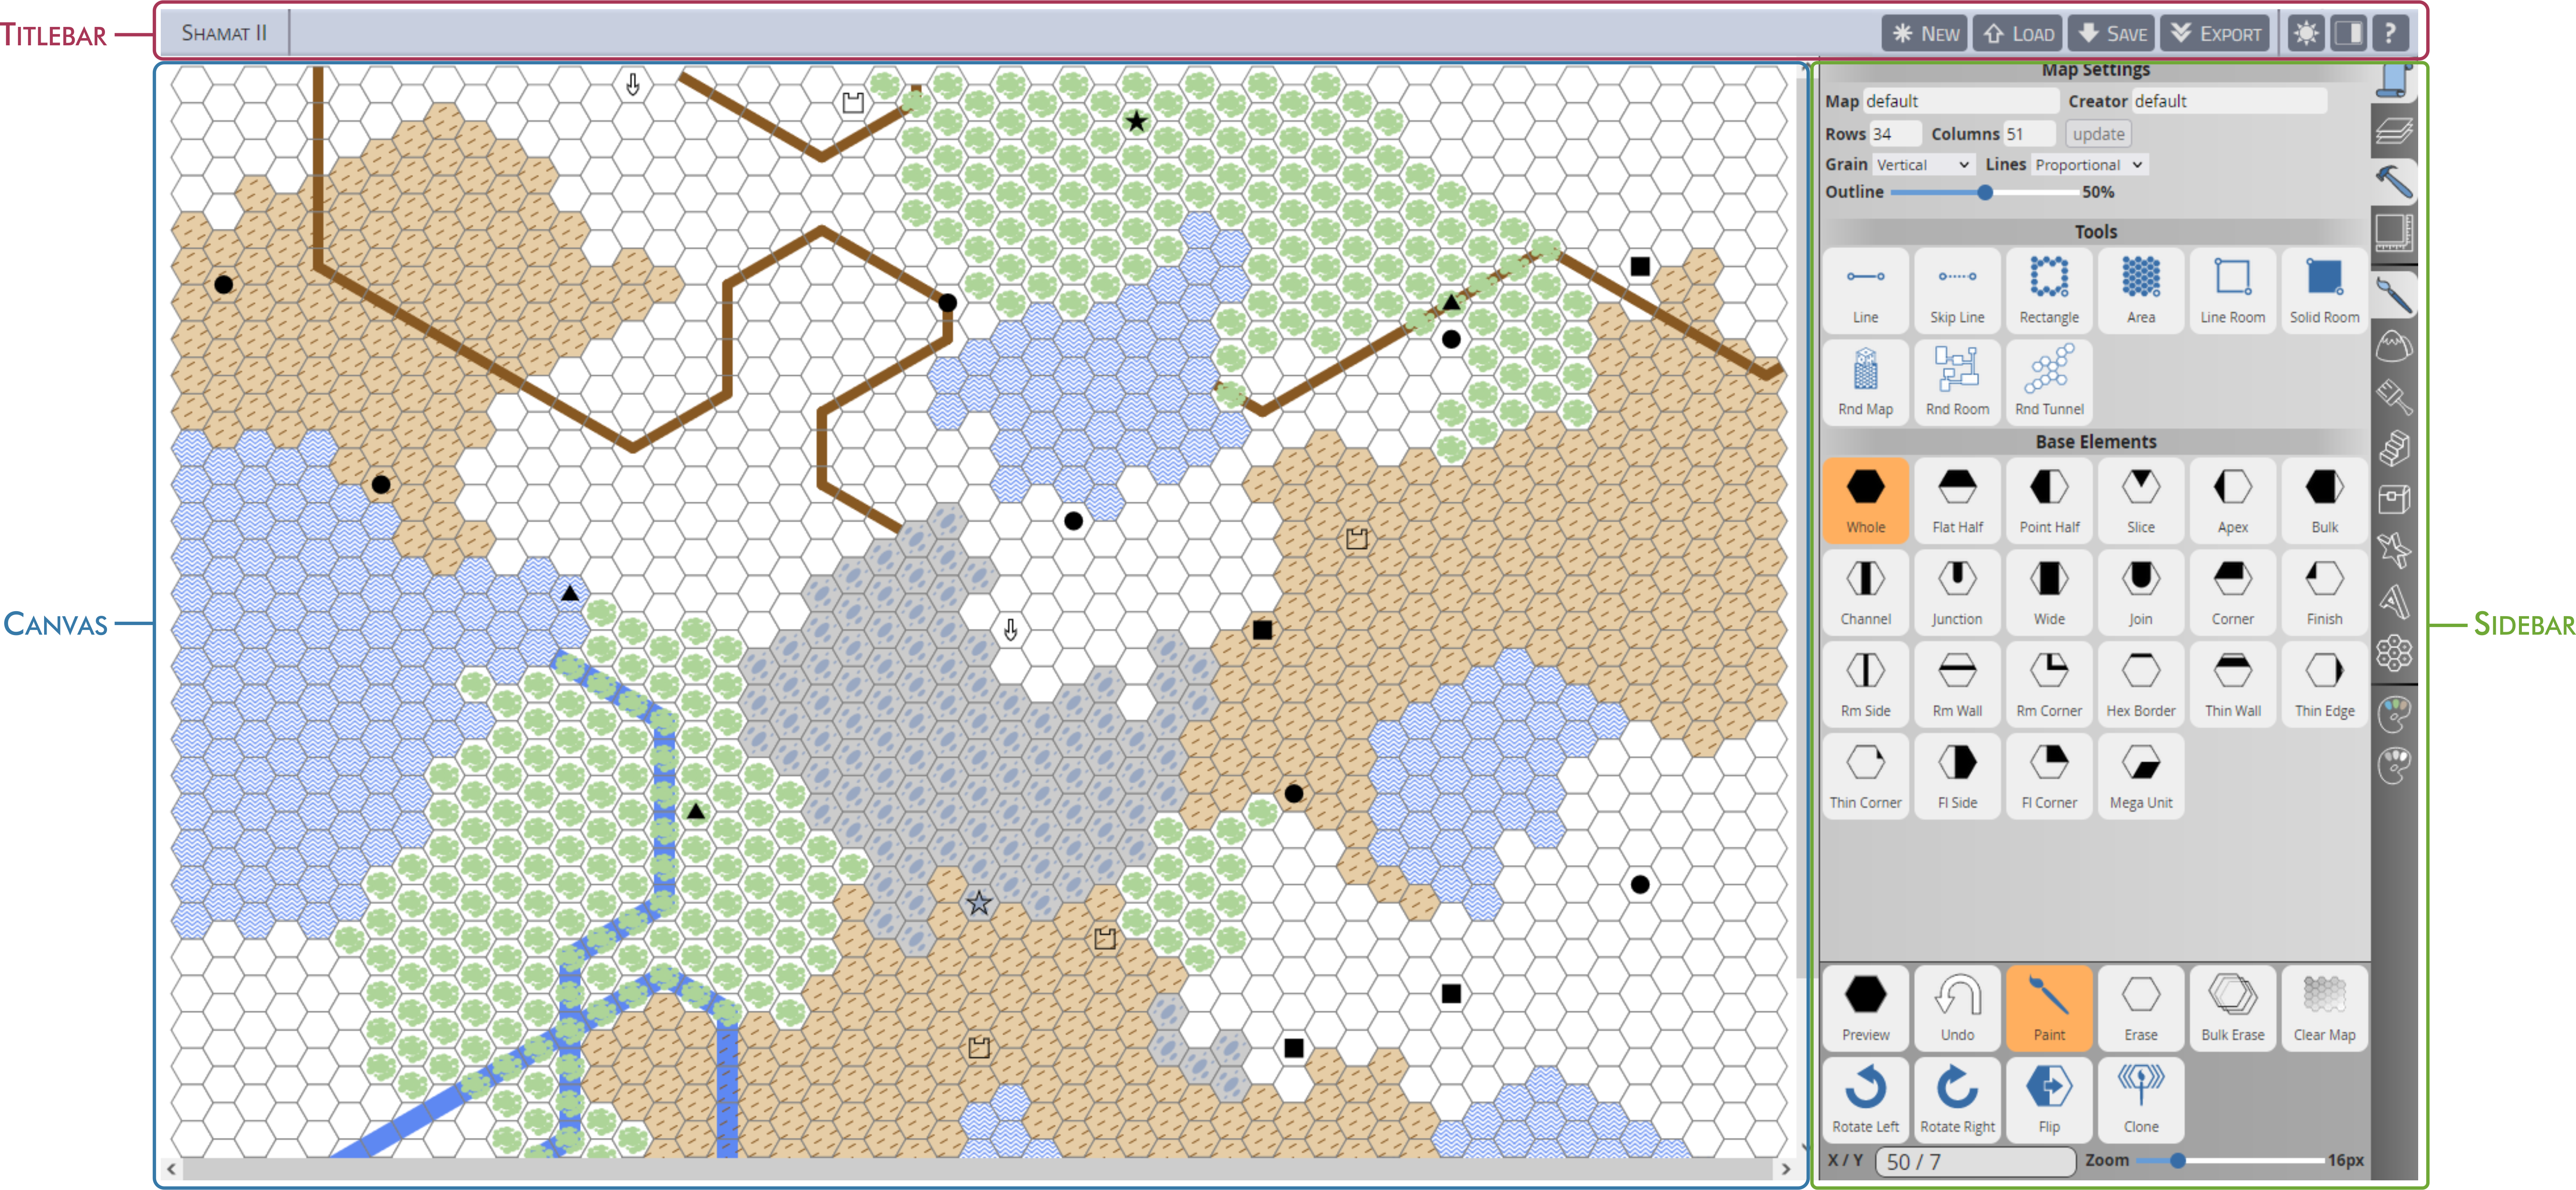
Canvas
This is the main part of the application and where you will be drawing your map. Part of the interface redesign in Shamat II was to make this area as large as possible, while still retaining usability in the other sections.
Titlebar
The titlebar at the top contains buttons for the main application functions. This picture details the icons you will find here.
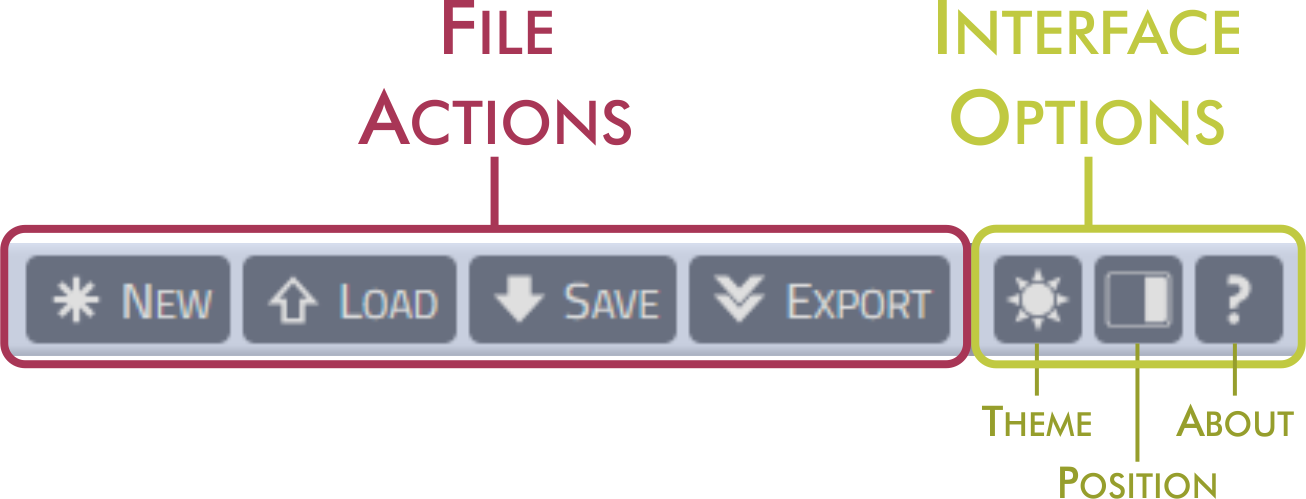
File Actions
New - Clears the entire map and starts fresh. The only things retained are any custom colors you may have defined.
Load - Allows you to load a data file. At present this can be a Shamat II map, a custom color palette, or a legacy Shamat map.
Save - Allows you to save a data file in one of the supported Shamat formats. The save options are:
- Shamat II Map - Saves a complete map in the new Shamat II format (.skmp file extension).
- Custom Colors - Saves your custom color definitions (.skcc file extension). These can be loaded into any Shamat II map.
- Legacy Map - Saves the map in the original Shamat format (.skmr file extension). Please note that maps saved in the legacy Shamat format will not contain anything specific to the new application; for example, custom colors will appear as black in the legacy map, and any new graphic elements that get added to Shamat II will not appear in the old map.
Export - Allows you to export a data file for use in external programs. The export options are:
- Map Image - Saves a PNG image of the current map. You will have some control over the size of the resulting image.
- Generic Map - Saves the map in a JSON format with descriptive data. For example, the elements in a hex are described by name ("wall"), facing (the amount of rotation), and color (derived from the material). The idea is that this is a description of the map which can then be loaded by other programs to render the map in their own way.
Interface Options
Shamat II will try to remember your interface setting choices and bring them up the next time you open it in the same browser. Some browser settings or plug-ins may block this memory feature.
Theme - This button allows you toggle between the Light and Dark interface theme.
Position - This button allows you to switch the location of the sidebar to the left or right side of the application.
About - This button displays the About dialog, which contains version information, links to documentation, and license terms.
Sidebar
The sidebar at the side of the application contains the various tools and settings you can use in constructing your map. The sidebar has two main sections: a menu for selecting tools and settings, and the main area that displays these components.
Here is the sidebar menu and what it contains:
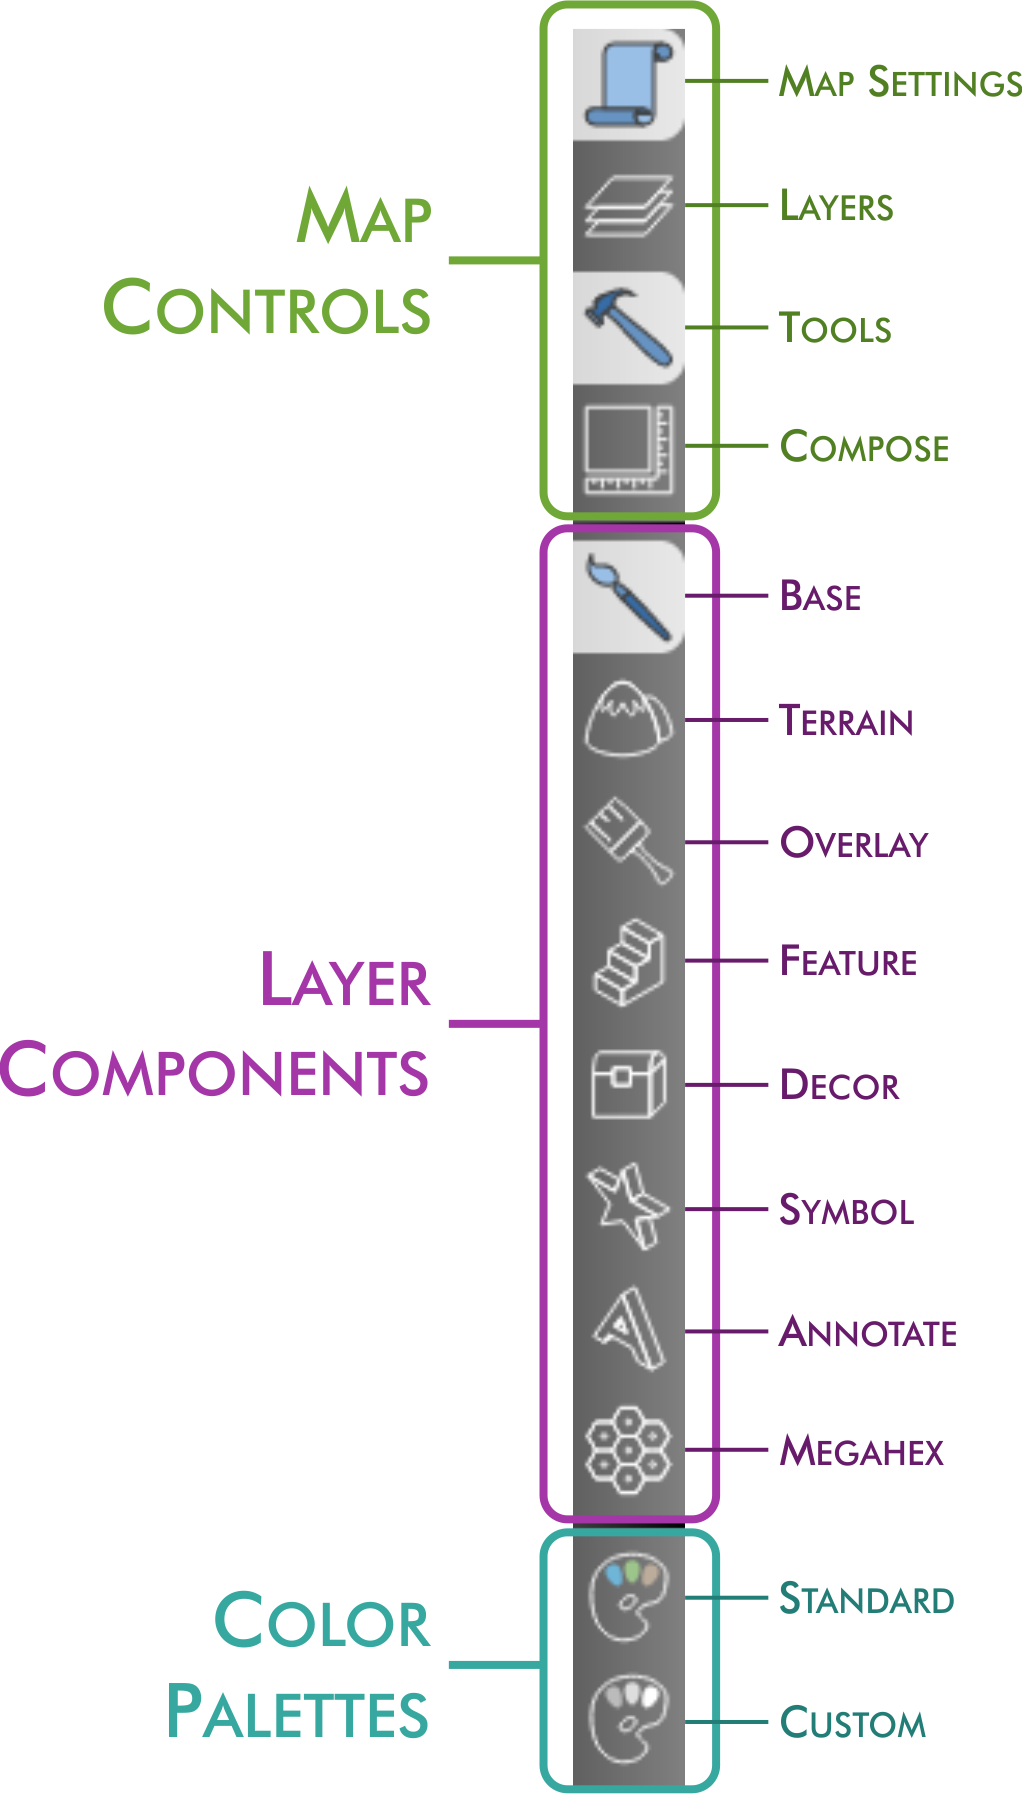
Map Controls
The controls in this section are inclusive, meaning you can turn each of them on or off as desired without affecting the other controls.
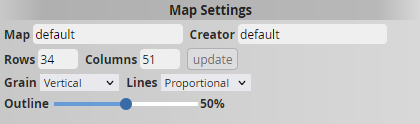
Map Settings - This section lets you define the primary attributes of your map, such as its name, size, and the grain and outline of the hexes.
Layers - This displays a control where you can show or hide each layer of the map as desired.

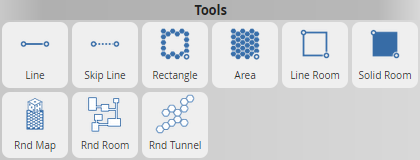
Tools - This will display the various map drawing tools such as lines, areas, and rooms. It also contains the random map generators.
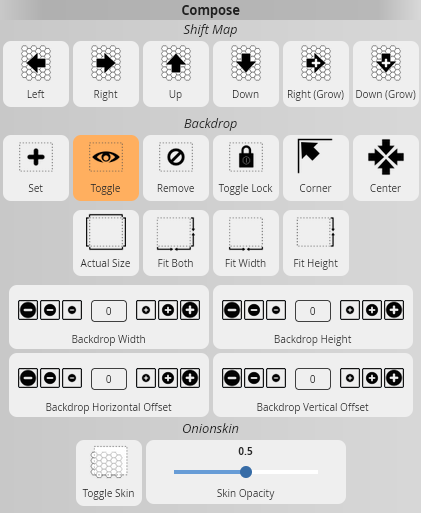
Compose - This opens a set of composition tools that allow you to make adjustments to the map. You can shift the map contents, add a backdrop to help design your map, and control the onionskin translucency of the map over the backdrop. If you add a backdrop to your map, it will be saved as part of the map file as well. Please note that large images will significantly increase the size of the map file.
Layer Components
The controls in this section are exclusive, meaning only one layer can be selected at a time and choosing one will deselect any other layer. Your drawing actions on the canvas will be done on whatever layer you have currently selected here.
About Layers |
|---|
|
You can think about layers in Shamat II as sheets of transparent paper that your map is drawn on. Below all the layers is the hex grid, and each layer then sits on top of it. The layers are stacked in the drawing order as shown in the Layer Components list - the bottom-most layer (Base) is first on the list and the first drawn by the canvas, while the top-most layer (Megahex) is last on the list and the last to be drawn. One of the changes in Shamat II was to make the Overlay layer work as originally planned. Instead of being a secondary Base layer with darkened colors like it was in the original Shamat, now it is a proper layer sitting above the Terrain layer. This makes it possible to create the kinds of maps we originally intended. For example, you can fill a hex on the Base layer in light green, add dark green grass on the Terrain layer, and then add a stone wall on the Overlay layer. This should allow for more visually pleasing maps which are also more structurally accurate. |
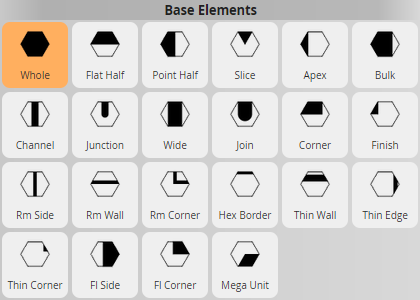
Most of the Layer Component menus are similar, containing a suite of graphic elements you can add to the map. Many of these elements can be rotated and flipped, too. The Base components shown here are a good example of what kinds of elements to expect:
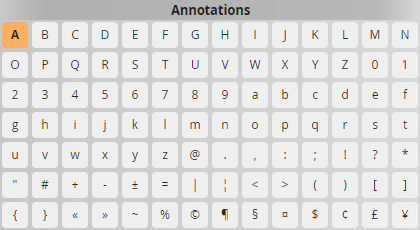
Two of the layers have different displays, however. The Annotate layer shows a selection of available characters to be added to your map. Up to two characters can be added to each hex, and they may be different colors from each other. These cannot be flipped or rotated.
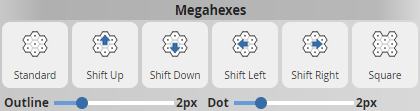
The Megahex layer component does not contain drawing elements, but rather the settings to control the megahex imposition on top of the map. Here you can adjust the placement of the megahexes, as well as tweak their outline and dot strength. You can also use square megahexes if preferred.
Color Palettes
The palette selectors here are exclusive, meaning that when one palette is shown the other is hidden. There are two palettes to choose from:
Standard - The standard palette contains all the colors from the original Shamat, along with the greyscale values. The colors have been re-arranged into spectrum order to make finding and comparing them easier.
Custom - The custom palette allows you to define up to 30 unique colors to use with your map. By double-clicking one of the palette items you bring up this material editor:
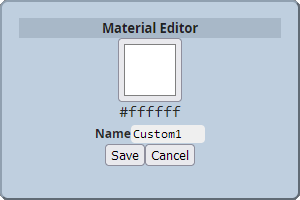
Click the color square in the center to open the color picker (the appearance of which will differ based on the browser you are using). After defining a color in the picker, the new color will be displayed here. Below it will be the CSS hex code for that color. You may enter a name for the color as well, up to 10 characters in length. Try to avoid using special symbol and punctuation characters in your color name, as these may cause issues loading the map here or elsewhere. The custom colors are saved as part of the map file. Custom colors may also be saved as their own file, which you can then load into other maps.
Common Tools
At the bottom of the editor panel is a set of common tools that are always visible:
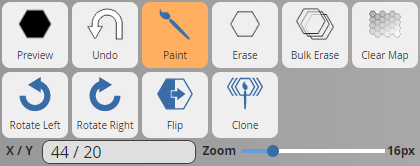
Preview - This will show the current selected component in the active color, plus any transformation of that component such as rotation. It does not display the active clone brush if one is effect, but rather the regular painting tool that will be used once cloning ends.
Undo - This allows you to undo the previous action. In most cases the application tries to perform an intuitive undo, so that a single continuous drawing action is undone. Some changes and edits are not undoable.
Paint - This is the standard drawing mode in the application, so it is made accessible all the time. The other drawing modes are found under the Tools submenu.
Erase - This allows you to erase the contents of hexes on the current active layer. So if the Terrain layer is active, the eraser will remove any terrain graphics from the hexes you click on, but will leave the other layer contents intact. To erase on different layers, make them the active editing layer.
Bulk Erase - This eraser removes all the target hex’s contents on every layer, leaving a completely empty hex.
Clear Map - Fully erases the contents of the current map. It does not change the dimensions of the map, and any custom color definitions are left in place. You will be asked to confirm before the map is cleared.
Rotate Left / Right - The two rotate buttons rotate the currently selected graphic component. Note that some components (such as annotations) do not rotate, and certain others may use special shape variants when rotating the graphic.
Flip - This button flips the current component, making its mirror image. Like the rotate action, some components may not flip or may use an alternate graphic for the flipped state.
Clone - This new feature allows you to select a hex on the map and then paint with it. When you click the clone button a hex selector will appear under the mouse cursor (currently the selector is the thick pink outline of a hex). Click on the hex on the map that you wish to clone and that hex will then appear under the cursor. You can draw with this like any other component. Note that this is a “destructive” operation, in that all layers of the cloned hex are copied. This includes any empty layers. So if you copy a hex with no annotations and paint it onto a hex containing annotations, those annotations will be destroyed. It’s possible this functionality will change in future, based on user feedback.
Mouse Tracker - The X/Y box shows the current row and column of the mouse cursor on the hex grid. This can be useful in positioning elements on your map.
Zoom - The zoom slider controls how large the map appears on the canvas.
Conclusion
This wraps up the walk-through of the Shamat II interface. You’re ready to begin experimenting with the application now. We may eventually provide a demo document as well going through how to create various maps with the application. Drop us an email if you would like to see specific demos or have questions and feedback about the application.
Appendix
File Extensions
These are the file extensions that are used by Shamat II.
.skmp - Shamat II map files end in the .skmp (“skimp”) extension and the file loader will treat files with this extension as a map. The extension is automatically appended when saving a Shamat II map. These files are JSON format.
.skcc - Shamat II custom color collections end in the .skcc (“skissy”) extension. This files contain only the color definitions for the custom palette, plus the author’s name and the Shamat II application version number. The version number is useful in case future versions of the application alter the file format. These files are JSON format.
.skmr - Original Shamat map files were saved with the .skmr (“skimmer”) extension. Shamat II supports loading and saving these files, though features which are exclusive to Shamat II will not be included in this format, or will be added with limitations (for example, custom colors will appear as black). These files are a custom DELIMITED TEXT format.
.png - Shamat II, like the original Shamat, saves map images in the standard PNG format.