About Dmorte
Dmorte is a planning and composing tool for creating your own programmed adventures and pick-your-path adventure books. It lets you visually lay out the flow of your adventure and enter the text that makes up the narrative. It also generates the randomised version of the output for you, with automatic numbering and linking provided.
Dmorte is built entirely in web technologies and runs in your browser. You can download the package to run locally on your computer within the browser, or access the online version. Both offer the same functionality, you just don't need an active web connection for the downloaded version.
Dmorte User Guide
Project
This tab contains the general information about your adventure project.
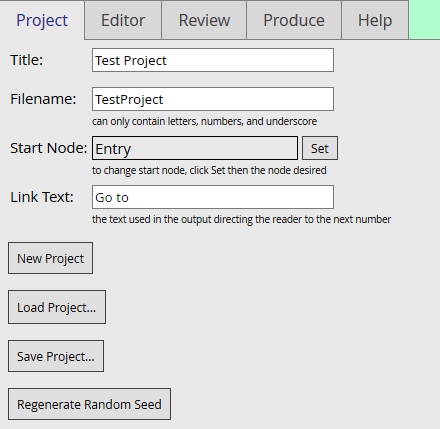
Title is the title of your adventure or book.
Filename will be used to when saving the project, as well as the review and produced texts.
Start Node is the main beginning paragraph of your adventure. It will always be first in the produced texts.
Link Text is the what will be used in the produced text tell the player/reader where to go next in the book.
New Project will start a new blank project with a default Start Node. Be sure to save any work you want to keep before starting a new project.
Load Project will let you load a previously saved Dmorte project from a file.
Save Project lets you save your current project to a file.
Regenerate Random Seed creates a new core random seed for arranging the paragraphs in random order.
Editor
There are two main concepts that underpin how Dmorte works - nodes and paths.
Nodes can be thought of as the paragraphs of your adventure, or the pages of your pick-your-path book. They have a label, which is what identifies them in the main flow diagram. They have a title, which can be the paragraph/page header in your adventure. Most importantly, they have a body, which is the full text of the paragraph/page in your narrative. Nodes can be WIP (needing further work) or COMPLETE (ready for publication). Finally, they can have outbound connections, which are paths.
Paths are the connections between nodes, and are the decisions that your player or reader makes in order to proceed. Some nodes will have multiple paths leading to different points, others will have a single path indicating the way forward, and nodes at the end of the adventure will have no paths at all. Some paths can lead back to the node that the player/reader came from. This is more common in a programmed adventure than in a pick-your-path book.
Here are the elements of the Dmorte interface. Shown is a simple adventure node map which displays the basic kinds of nodes and paths you will have.
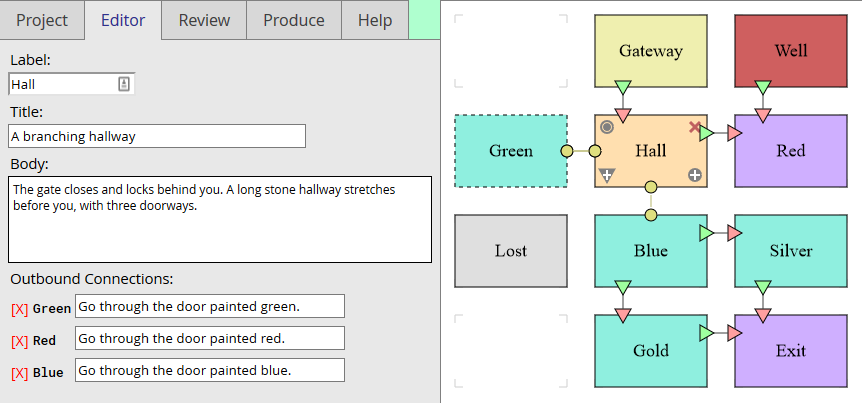
On the left side of the interface are the navigation tabs. Currently selected is the Editor pane, which displays editing tools for the currently selected node.
On the right side of the interface is the node map, which shows all the defined nodes of your adventure and how they connect. The current selected node is highlighted in pale orange and display the node modification icons.
Label is the text that will identify this node on the node map.
Title is an optional header for the node that will be used in the output of the adventure.
Body is the main text of the node, and is what will be used for this paragraph of the adventure or page of the book.
Outbound Connections are the paths from this node to other nodes. The text entered here will appear after the Body text, with the number and name of the linked node included.
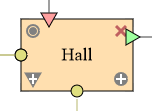
The tools and symbols on nodes and paths are shown here.
Outbound one-way paths are shown with a green arrow.
Indbound one-way paths are shown with a red arrow.
Bi-directional paths are shown with gold discs at both ends.
The circular grey icon in the upper left lets you toggle the node status between WIP and COMPLETE. New nodes default to WIP status.
The triangular grey icon in the lower left lets you quickly create a new one-way outbound path. Click this icon then the target node to create the path.
The circular grey icon in the lower right lets you quickly create a new bi-directional path. Click this icon then the target node to create the path.
The red X in the upper right corner lets you delete the node. All associated paths with that node will also be removed.
Nodes are also color-coded to give you a quick idea how they are connected within the map:
- The primary Start Node is colored yellow.
- A Standard Node has paths leading both in and out and is colored cyan.
- A Terminus Node has only paths leading into in and is colored purple. It marks the end of a narrative path.
- A Phantom Node has no paths and is colored grey. It cannot be reached as part of the normal story flow and will be marked as unreachable in the output texts.
- A Begin Node has outgoing paths and is colored red. These represent alternate starting points for the story, in case there are multiple beginnings.
- The current Selected Node is highlighted in tan, regardless of what kind of node it is.
- Nodes which are a WIP (work-in-progress) have a dashed outline. When the node is finished, click the status gadget to mark it as COMPLETE, when it will then get a solid outline.
Nodes can be repositioned on the node map by clicking and dragging the node with the mouse and then releasing it into an open spot.
Review
This tab lets you review your narrative structure in a logical fashion. Each node is spelled out within the document, beginning with the Start Node and then any optional additional Begin Nodes. The nodes are laid out in the document in this format:
Title [Label]
Body
» Outbound Connection #1
» Outbound Connection #2
etc
One of the nodes from our example file would look like this in the Review panel:
A Branching Hallway [Hall]
The gate closes and locks behind you. A long stone hallway stretches before you, with three doorways.
» The Green Room: Go through the door painted green.
» The Red Room: Go through the door painted red.
» The Blue Room: Go through the door painted blue.
The Export Review Text button lets you save a text file of the Review pane contents. The file's name will be the project Filename with "-review.txt" added to the end.
Produce
This tab produces the randomised and numbered paragraphs for your adventure. The first paragraph will always be the Start Node one, and any additional optional Begin Node paragraphs will come next. After that is the full node map in random order. The nodes are laid out in the document in this format:
# - Title
Body
Outbound Connection Text + Link Text + Target #
The Outbound Connection Text is the text entered for each Outbound Connection on the node. To this is appended the project's standard Link Text, and then finally the number of the target node paragraph.
One of the nodes from our example file would look like this in the Produce panel:
4 - A Branching Hallway
The gate closes and locks behind you. A long stone hallway stretches before you, with three doorways.
Go through the door painted green. Go to paragraph 7
Go through the door painted red. Go to paragraph 3
Go through the door painted blue. Go to paragraph 10
The Export Produced Text button lets you save a text file of the Produced pane contents. The file's name will be the project Filename with "-produced.txt" added to the end.
The Regenerate Random Seed button lets you create a new random seed that determines the order of the paragraphs. Save the project once you get an order you like so that it uses that same order in future.
Help
This tab contains specific help items for using the program. It also contains other information about the program, as well as details on the software license.